Updates
Get access to the latest features and extended vehicle support.
Diagnostics are evolving as rapidly as modern vehicles. That is why regular updates to TSPro and Troodon diagnostic tools are crucial for all car repair shops, technicians, and enthusiasts who want to work with accurate and up-to-date data.
Why update?
Diagnostic updates offer a number of advantages:
- Extended vehicle support: Access to new models and brands.
- Improved features: New diagnostic options and optimization of existing features.
- Increased stability: Bug fixes and feature optimization.
Our updates bring new features, an expanded vehicle database, and optimizations that increase speed, stability, and ease of use. The interface is clearer, the controls are more intuitive, and the overall operation of the system is more efficient.

What will the updates bring you?
- Extended brand and model support – access to new vehicles, including the latest versions of control units.
- New diagnostic options – advanced functions for modifying and setting control units, resetting intervals, and customizing components.
- Improved user interface – for example, the new DiagCenter menu, which is faster, clearer, and designed for easier practical use.
- Stability and security – the updated system responds faster, is more reliable, and is ready for the new generation of vehicles.
Diagnostics is not just about reading error codes – it is a tool that allows you to effectively troubleshoot faults, speed up your work, and provide better service to your customers. Regular updates ensure that it remains fully prepared for newer vehicle types.
DevCom Portal
All information about your diagnostics at your fingertips. The DevCom diagnostics portal allows you to manage updates for your diagnostics, order new update packages and available software extensions for your diagnostics. Simply register your diagnostic device and you will never miss an update or new feature again.
How to update TSPro and Troodon diagnostics?
TSPro and Troodon device software updates can be performed using the Diag Center program. Updates can be performed at any time, and license authorization (approval) is automatic in most cases.
Requirements for updating
Without fulfilling these conditions, it is not possible to perform the update.
- You have enabled online updates (contact your dealer)
- Your computer and device are connected to a reliable power source
- Your Internet connection allows you to download up to 200 MB
- You have a valid email address (in case manual authorization is required)
- Your PC configuration allows updates to be performed
- The device is connected to your PC via a network or USB
To start the update process, click the "Update" button in the Diag Center program. We recommend running the program as an administrator.
Update instructions
After purchasing the update through your diagnostics dealer, continue according to following steps:
1. Run the Diag Center application
For the update to work properly, we recommend running the program as an administrator. Right-click on the DiagCenter icon and select “Run as administrator”.
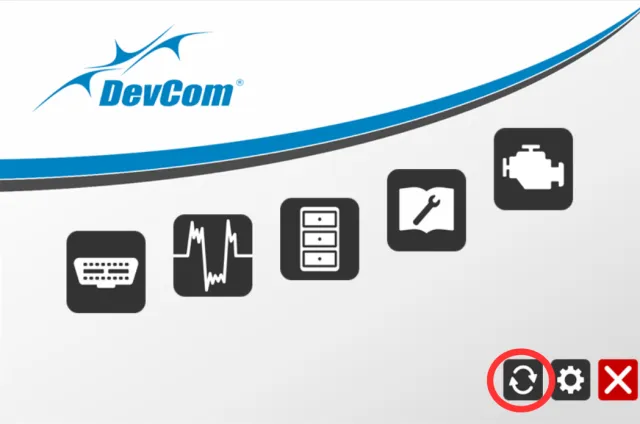
2. Click the Update icon in the main menu
At this point, you should have the Diag Center application open. In the application, click on the "Update" button. The icon is located at the bottom as the third from the right (rotating arrows).
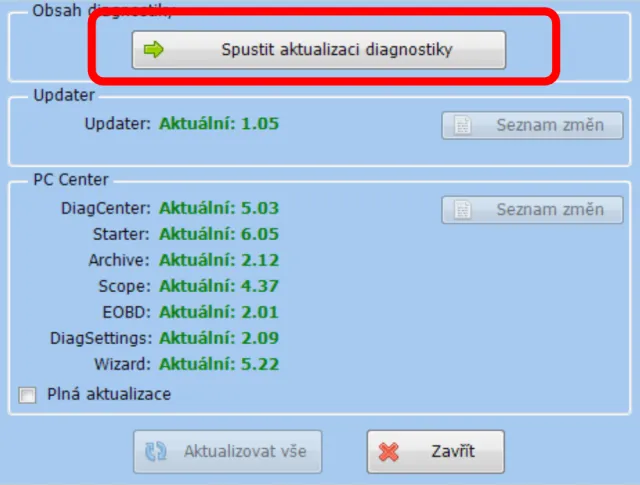
3. Click the “Run Module Update” button
4. Installing the update software
The Wizard (v5.x.x) will be downloaded to your computer online after clicking “Update”. After opening it, select the connection method of your device to the PC. We recommend connecting via USB.
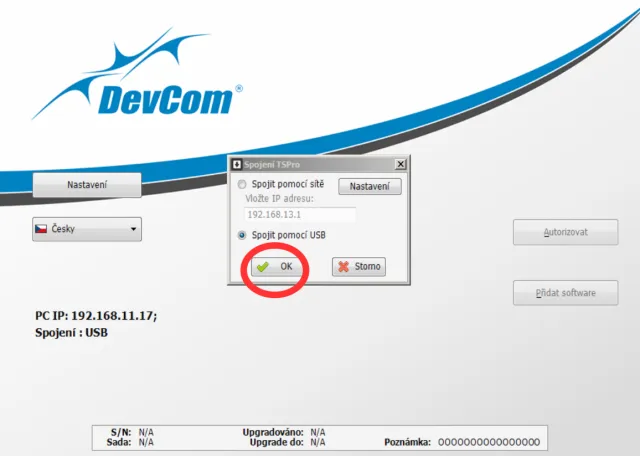
5. Preparing for the update
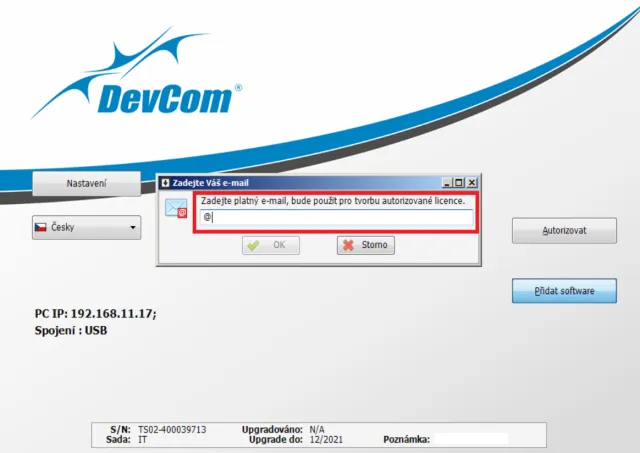
Wait for the connection between the device and the computer to be established. Then click on the “Add Software” button.
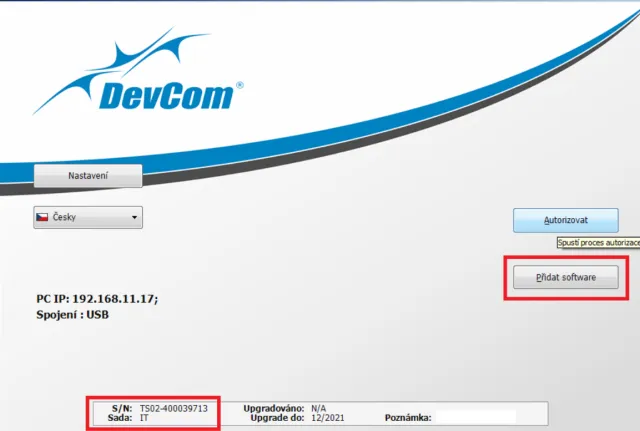
Enter the email address to which you will receive confirmation of the activation of the updated license. Without entering a valid email address, the device will not work after the update!
6. Updating the device
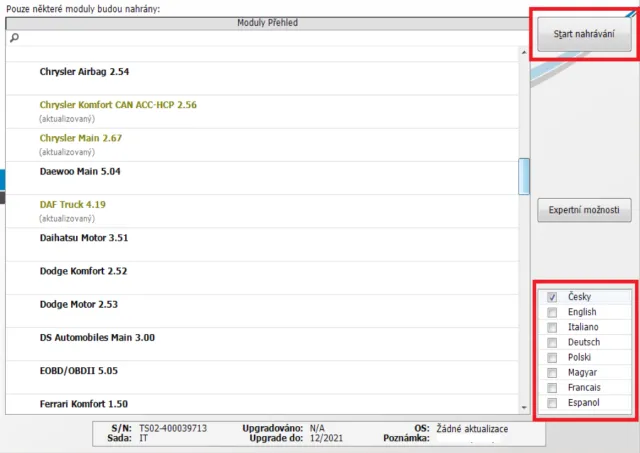
After entering the e-mail address, the program will download data about the instrument and installed modules. Select the language to be installed in the device in the bottom right. Then click on the “Start uploading” button.
Wait until the software is fully uploaded to the device. This operation may take several minutes, depending on specific software license and update size.
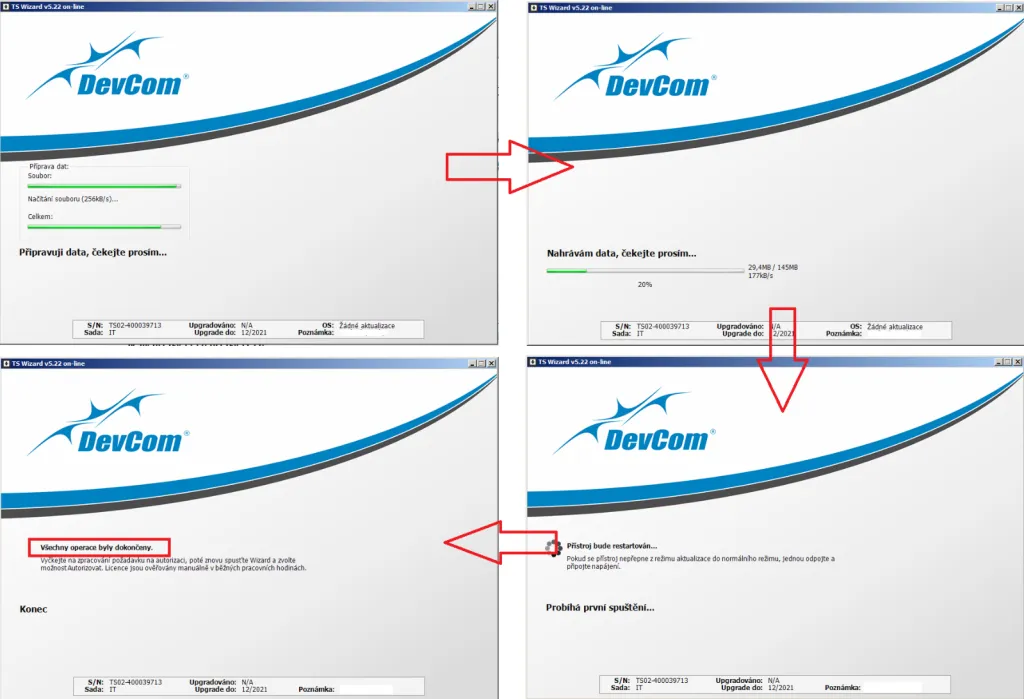
When recording is complete, the text “All operations have been completed” is displayed. The license is authorized automatically. If the automatic authorization fails, continue to the next step.
7. License Authorization
Note: This step is only necessary if the automatic authorization failed in the previous step. Automatic authorization limited to a certain number of attempts, therefore manual authorization is required for example when you attempt to update the device multiple times per day.
Close the TS Wizard window and wait for the activation email to arrive at the address you entered (the sender will be diagnostika@devcom.cz). If the email hasn’t arrived, check the “Spam” folder in your inbox first. License approvals take place only on weekdays during normal business hours, if the email does not arrive on subsequent days, please contact diagnostika@devcom.cz.
If you have already received an email confirmation of activation, run the Wizard again, following steps 1 – 4 of this guide. Then start the PC Center program again, click on the “Update” button, confirm the update conditions and select the way to connect the device to the computer.
Next, click on the “Authorize” button in the Wizard
The authorization file is downloaded and uploaded to the device. The text “Authorization OK” will then be displayed
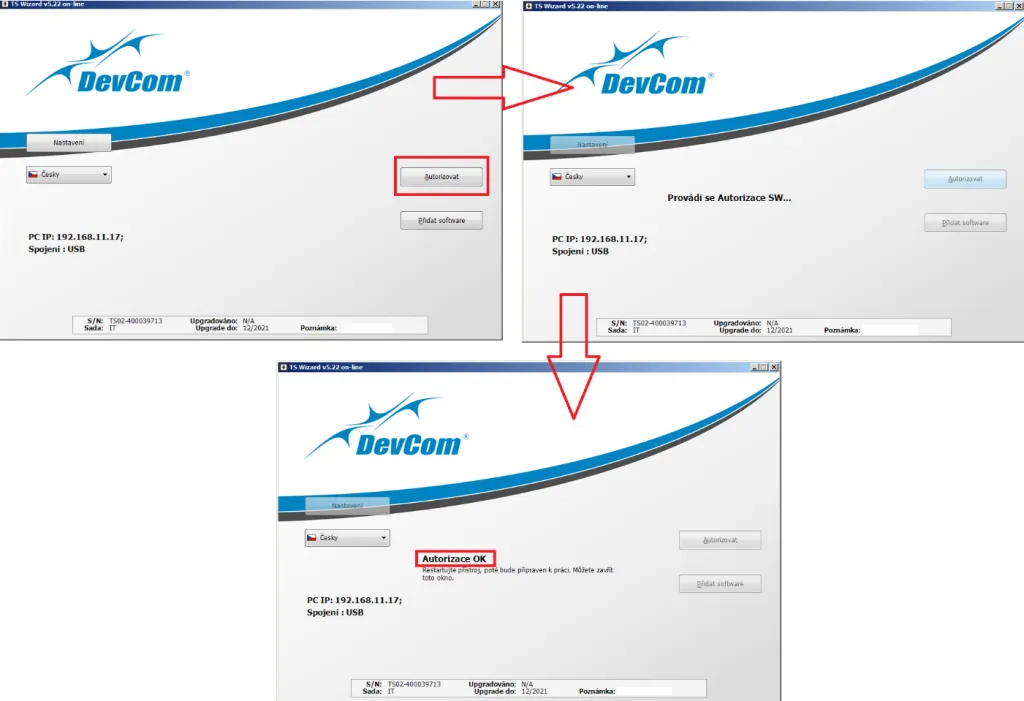
You can now close the TS Wizard window. Restart the device. The update is now successfully completed and your updated TSPro or Troodon is ready to work.